
Raised Bed Gardening: Sizing, Soil, and Setup That Actually Work
The measurements, soil ratios, and setup choices that decide whether a raised bed thrives or quietly disappoints, drawn from extension research and seasons of building beds that actually produce.
Build raised beds no wider than 4 feet so you can reach the center from either side without stepping on the soil, and keep walkways at least 18 inches wide. Fill them with a blend of roughly half to two-thirds topsoil and one-third to one-half plant-based compost, never bagged potting soil or pure garden dirt. Most vegetables want 12 to 18 inches of soil depth, though leafy greens get by on 6 to 8 inches and carrots, tomatoes, and squash reward you for 18 inches or more. Site the bed where it gets 6 to 8 hours of direct sun, expect it to dry faster than the ground, and plan to water more often. Get the size, soil, and sun right at setup and the bed does most of the work for years.
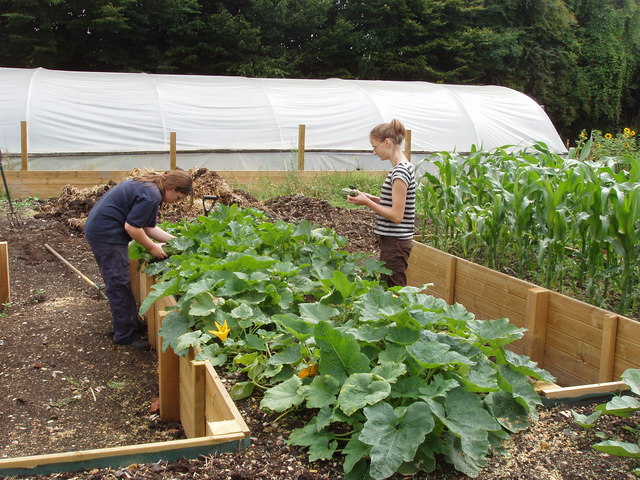
What a raised bed actually changes
A raised bed is simply a contained or mounded volume of soil sitting above the surrounding grade. That sounds modest, but it changes the three variables that decide most garden outcomes: the soil you grow in, the drainage around the roots, and how compacted that soil stays over a season. Because you fill the bed yourself, you sidestep whatever clay, rubble, or exhausted dirt your yard came with. Because the soil sits proud of the grade, water moves down and out instead of pooling. And because you garden from the paths rather than walking on the bed, the root zone never gets crushed underfoot.
Those advantages are real, but they are not automatic. A raised bed filled with the wrong material, sized so you have to climb into it, or parked in afternoon shade will underperform a plain patch of decent ground. The point of this guide is to lock in the handful of setup decisions that the good gardens get right and the disappointing ones get wrong. Once those are settled, raised beds become genuinely low-maintenance for years at a stretch.
There is also an honest tradeoff worth naming up front. Raised beds warm earlier in spring and drain faster, which is a gift in cool, wet climates and on heavy clay. That same fast drainage becomes a liability in hot, dry regions, where a tall bed can dry out by midday and demand daily watering. The right answer depends on where you garden, and we will come back to that throughout.
Sizing: width, length, and the reach rule
The single most important dimension is width, and the rule behind it is simple: you should never have to step into the bed. Compacting the soil you just built defeats the whole exercise. The reach of an average adult arm sets the limit. A bed you can access from both sides should be no wider than 4 feet, so the center is roughly 2 feet from either edge. A bed pushed against a wall or fence, reachable from one side only, should be no wider than about 2.5 feet.
Length is far more forgiving and is governed mostly by your lumber and your patience. Boards of 6 to 8 feet are common because shorter spans are less likely to bow outward under the weight of wet soil. If you go longer, plan a cross-brace or a center stake to keep the long sides from bellying out. Leave walkways between beds wide enough to kneel, carry a harvest basket, or run a wheelbarrow through. Eighteen inches is a workable minimum; 24 to 36 inches is comfortable and the right call if you use a cart or a wheelchair.
| Configuration | Recommended max width | Why |
|---|---|---|
| Access from both sides | 4 feet | Center reachable from either edge without stepping in |
| Access from one side (against a wall) | 2.5 feet | Full reach to the back without leaning over |
| Wheelchair or seated access | Height 24 to 27 inches | Comfortable working height with knees clear |
| Walkway between beds | 18 to 36 inches | Room to kneel, harvest, and run a cart or wheelbarrow |
A 4 by 8 foot bed is the workhorse for good reason. It gives 32 square feet of growing space, fits standard lumber with almost no waste, and keeps every plant within an easy arm's reach. If you are planning your first bed and feeling unsure, build that one. It is hard to outgrow and easy to replicate once you are hooked.
You should never have to step into the bed. The day you do, you have undone the main reason to build one.
How deep does the soil really need to be?
Depth is where a lot of well-meaning advice goes vague. The honest answer is that it depends on what you grow and on what sits beneath the bed. If your raised bed has an open bottom over decent native soil, roots can push down past the frame, so the frame height is less critical. If the bed sits on a patio, gravel, or hard-packed ground roots cannot penetrate, the soil depth inside the frame is the entire root zone, and you need to plan for it deliberately.
Use crop rooting depth as your guide. Leafy greens, herbs, and most quick salad crops are content in 6 to 8 inches. The broad middle of the vegetable garden, including beans, peppers, and bush squash, wants 12 inches. Deep feeders and long-rooted crops such as tomatoes, carrots, parsnips, and winter squash reward you with 18 inches or more, especially on a hard surface where they cannot escape downward.
| Crop group | Minimum soil depth | Comfortable depth |
|---|---|---|
| Lettuce, spinach, herbs, radishes | 6 inches | 8 to 10 inches |
| Beans, peppers, cucumbers, bush squash | 8 to 10 inches | 12 inches |
| Tomatoes, carrots, parsnips, winter squash | 12 inches | 18 to 24 inches |
| Mixed bed on a hard surface (patio, gravel) | 12 inches | 18 inches or more |
Depth also buys you resilience. A deeper bed holds more moisture, swings less violently in temperature, and gives roots somewhere to retreat during a heat wave. In hot climates, the extra few inches that feel like an indulgence in spring become the buffer that keeps plants alive in July.
The soil mix that works (and the ones that quietly fail)
More raised beds disappoint over their soil than over any other single factor. The temptation is to grab the cheapest fill available, but generic fill dirt, heavy clay, and construction spoil will hobble a bed for years. At the same time, the opposite extreme fails too: a bed filled with pure compost or bagged potting soil behaves like an oversized pot, drying out fast and slumping as the organic matter breaks down.
The reliable target is a balanced blend that holds structure and moisture while still draining freely. A workable ratio is roughly one-half to two-thirds quality topsoil and one-third to one-half plant-based compost. The topsoil gives the mix body and water-holding capacity; the compost supplies nutrients, biology, and tilth. If your topsoil is heavy with clay, cutting in some coarse sand helps loamy texture. Skip fresh manure unless a soil test shows you need the phosphorus, and resist the urge to make the whole bed compost just because compost is good.
A note on Mel's Mix and the soilless approach
The square-foot gardening method popularized a soilless recipe of equal parts compost, peat moss or coconut coir, and coarse vermiculite. It works, particularly on hard surfaces and in beds with no native soil contact, and it is wonderfully light and weed-free at the start. The catch is cost and longevity: it leans heavily on bought materials and needs steady compost topping each season as the organic fraction settles. For a bed sitting on open ground, a topsoil-and-compost blend is usually cheaper and more forgiving.
Do not fill a bed with bagged potting soil unless it sits on concrete; it drains too fast and dries out by midday.
Do not use straight garden or fill dirt; it compacts under bed conditions and drains poorly.
Do not make the whole bed compost; it slumps as it decomposes and can hold too much water.
Do top-dress with an inch or two of fresh compost every spring to replace what the soil consumes.
Filling a deep bed without buying a mountain of soil
A tall bed holds a surprising volume of soil, and filling an 18-inch bed entirely with bought blend can cost more than the lumber did. The answer is to fill the lower zone, well below the root line, with bulky organic material that breaks down slowly and reserve your good soil-and-compost blend for the top. As a rule, most vegetables only need the upper 12 inches or so to be high-quality soil, so anything beneath that is fair game for cheaper filler.
The classic approach is hugelkultur, a German technique whose name means hill or mound culture. You lay logs and sturdy branches at the base, then smaller twigs, leaves, straw, and grass clippings, and cap the whole thing with your soil blend. As the wood decays over several seasons it holds moisture like a sponge and slowly feeds the bed. It costs essentially nothing if you have prunings or storm debris on hand.
Lay large logs and thick branches across the bottom of the bed as the base layer.
Fill gaps with smaller twigs, then a layer of leaves, straw, and grass clippings.
Add a layer of rough compost or aged manure to kick-start decomposition.
Cap the top 10 to 12 inches with your quality topsoil-and-compost blend.
Mulch the surface, and expect the bed to settle a few inches in the first year; top it up.
One caution with wood-based filling: fresh, undecayed wood briefly ties up nitrogen as it starts to break down, which can leave the first season's crops looking pale and hungry. Counter it with a nitrogen-rich amendment in the top layer, or expect a slightly lean first year that improves markedly as the wood matures.
Materials, siting, and the choices that age well
Frame material decides how long the bed lasts and, in some cases, what ends up in your soil. Naturally rot-resistant woods such as cedar and hemlock are the standard for good reason, giving a well-built wooden bed a service life of roughly 5 to 20 years depending on climate and thickness. Galvanized or corten steel beds shrug off rot entirely and can last decades. Brick, stone, and concrete block are essentially permanent.
Siting matters as much as materials. Most vegetables, and certainly the sun-lovers like tomatoes, peppers, and eggplant, want at least 6 to 8 hours of direct sun a day. Watch the spot across a full day before you commit, because a fence or a tree that throws afternoon shade in June will quietly cap your yields. Leafy greens and many herbs tolerate less, so reserve the part-shade corners for them. Orient longer beds so plants do not shade each other, and keep tall crops on the north side.
Best frame materials: cedar, hemlock, galvanized or corten steel, brick, stone, concrete block.
Materials to avoid: CCA pressure-treated lumber, creosote railroad ties, untested salvage metal, synthetic fillers.
Sun target: 6 to 8 hours of direct sun for fruiting crops; less is fine for greens and herbs.
Watch the site across a full day before building to catch afternoon shade you would otherwise miss.
Watering and the climate honesty most guides skip
Here is the part the glossy raised-bed marketing tends to underplay. Raised beds dry out faster than the open ground, and the taller and better-draining the bed, the faster it goes. In a cool, damp climate that is precisely the benefit you wanted. In a hot, arid one it is a standing chore. Plan your watering around your region, not around a generic schedule, and be honest with yourself about how often you will actually show up with a hose.
For most beds, the practical answer is consistent moisture delivered low and slow. Drip irrigation or soaker hoses on a timer keep the root zone evenly damp and keep water off the leaves, which cuts down on fungal disease. A two to three inch mulch layer of straw, shredded leaves, or wood chips on the surface dramatically slows evaporation and is the single highest-return habit in a raised bed. Water deeply and less often to encourage roots downward, rather than a daily light sprinkle that keeps them shallow.
| Climate | Drainage as a factor | Watering reality |
|---|---|---|
| Cool and wet (Pacific Northwest, Northeast) | Major benefit; beds warm and drain early | Often less watering than in-ground; ideal use case |
| Temperate and mixed | Mild benefit | Regular watering; drip plus mulch keeps it easy |
| Hot and arid (Southwest, deep South summers) | Liability; beds dry fast | Frequent, sometimes daily; deeper beds and heavy mulch are essential |
Planting it out: spacing, succession, and first-season expectations
Because you garden from the paths and never compact the soil, raised beds let you plant more intensively than the old row spacing assumes. Space by the mature size of the plant and how much air it needs, not by leaving tractor rows you do not have. Lettuce and other greens can sit on a tight grid; tomatoes still want 18 to 24 inches between plants for airflow and disease control. The goal is a canopy that closes over the soil to shade out weeds without crowding plants into a humid, disease-friendly thicket.
The same no-walk soil structure makes succession planting easy. As soon as the spring greens bolt in early summer heat, pull them and drop in bush beans or a second sowing of carrots. A 4 by 8 bed managed this way produces far more over a season than its square footage suggests. Keep a simple plan so you are never staring at a bare patch wondering what goes there.
Set your first-season expectations honestly. A brand-new bed, especially one built over a wood-filled base, is still establishing its biology and may grow a touch lean in year one. By the second and third seasons, as the compost matures and the lower layers break down, the bed hits its stride. Top-dress with compost each spring, rotate heavy feeders around the bed year to year, and the soil keeps getting better rather than wearing out.
Space by mature plant size, not legacy row spacing; intensive spacing is the raised-bed advantage.
Aim for a closing canopy to shade out weeds without trapping humidity around stems.
Use succession planting: replace spent spring crops with summer sowings in the same bed.
Top-dress with compost each spring and rotate heavy feeders to keep the soil improving.
Frequently asked questions
How deep should a raised garden bed be for vegetables?
Most vegetables thrive in 12 to 18 inches of good soil. Leafy greens and herbs manage in 6 to 8 inches, while deep-rooted crops like tomatoes, carrots, and winter squash do best with 18 inches or more. If the bed sits on a hard surface like a patio, treat the soil inside the frame as the entire root zone and aim for at least 12 inches.
What is the best soil mix for a raised bed?
A balanced blend of roughly one-half to two-thirds quality topsoil and one-third to one-half plant-based compost works for most beds. Avoid filling with bagged potting soil, which drains too fast unless the bed is on concrete, and avoid straight garden or fill dirt, which compacts. Do not make the whole bed pure compost either, since it slumps and holds too much water as it decomposes.
How wide should a raised bed be?
No wider than 4 feet if you can reach it from both sides, so you can tend the center without stepping on the soil. Against a wall or fence with access from one side only, keep it to about 2.5 feet. Width is the dimension that matters most; length is flexible, though spans over 8 feet usually want a center brace to keep the sides from bowing.
How do I fill a deep raised bed cheaply?
Fill the lower zone, below the root line, with bulky organic material and reserve your good soil blend for the top 10 to 12 inches. The hugelkultur method layers logs, branches, twigs, leaves, and grass clippings at the base, capped with soil. It costs almost nothing and improves moisture retention as the wood decays. Avoid synthetic fillers like plastic or styrofoam, which block drainage and never break down.
Is treated wood safe for raised garden beds?
Avoid old pressure-treated lumber, especially arsenic-based CCA stock common before the mid-2000s, and never use creosote-soaked railroad ties; both can leach into the soil and your food. Modern treated lumber is lower risk, but for edibles many gardeners choose naturally rot-resistant cedar or hemlock, galvanized steel, or brick instead. If you reuse questionable wood, line the inside with heavy plastic.
How much sun does a raised bed need?
Fruiting vegetables such as tomatoes, peppers, and eggplant want at least 6 to 8 hours of direct sun per day. Leafy greens and many herbs tolerate less and can go in part-shade corners. Watch your chosen spot across a full day before building, since a fence or tree that throws afternoon shade can quietly cap your yields.
Sources